This is the start of an inspiration patch, where I hope that fellow scrappers and creators will come and find some inspiration, or even leave some inspiration for me.

Wednesday 30 March 2016

Love this Boy Mixed Media Layout - BoBunny Believe Collection

Hello Everyone

I am just about to turn in for the night and quickly just posting this project.
I am sitting here and can feel the chill in my feet....winter is on it's way!!!

So today I have a mixed media layout, using the gorgeous and special Believe Collection.
This really is a fabulous collection and you should check it out.


My son had been eating a red ice lolly and then fairly soon thereafter, fell asleep in the lounge chair.
This was about about 2 years ago.  I had to take a photo of this red lipped, little boy, fast asleep. LOL

Here's some of the close-ups.


I really had so much fun with this collection that the very next project was also created with this collection.  I will share that one shortly.

In the meantime, have yourself a good evening!
Thanks for the visit.
Denise x

Tuesday 29 March 2016

Birthday Card - FabScraps Kaleidoscope Collection and Sizzix Dies

Hello Everyone

It's my sisters Birthday today and so I made her a Birthday card.


I used the fresh and funky collection from FabScraps, Kaleidoscope, along with the Sizzix dies listed below.


SIZZIX THINLITS DIE - BRIGHT BUBBLES


Sizzix Bigz Die - Circles

Here's a closer look at the card.


To make this card, please find the instructions below.

Supplies List:
Card Kit: Kaleidescope MC83 001A
Cardstock: Purple, Fuschia, green, white and navy
Greeting Stamps – Happy Birthday – Penny Black
Pigment Ink – Brown, pink and green
Die-cuts: Sizzix Thinlits Die – Bright Bubbles; Various leaf die-cuts
Embossing Folder: Sizzix Dots
2 medium sized pink/purple flowers
White acrylic paint
Brown pearls
Brown koki pen

  1. Cut a piece of white cardstock, 15cm x 30,5 cm and fold in half.
  2. Cut down a piece of stripey patterned paper from the card kit to fit the cardstock. Approx. 14cmx14,5cm.  Stick this onto the cardstock.
  3. Cut some circles from the purple and fuschia cardstock with the Sizzix circle die and then emboss these with the Sizzix embossing folder.
  4. Fussy cut one circle from the circle patterned paper, as per the photo.  Stick all the circles down onto the card, as per the photo. Raise the fussy cut circle with double sided tape.
  5. Add highlights to these circle edges with white acrylic paint.
  6. Die-cut the bubbles from the navy cardstock and also adhere to the card, as per the photo.
  7. Stamp the sentiment with brown pigment ink, in the bottom right hand corner.
  8. Die-cut various leaves from the green and white cardstock.  Ink the white leaf edges with pink pigment ink and then green leaves with green pigment ink.
  9. Adhere the leaves, along with the flowers and brown pearls, as per the photo.

We are almost off to a family dinner, so thought I would quickly post this.
I hope you have a super evening!
Denise x

Monday 28 March 2016

Easter Goodie Bags - BoBunny

Hello Everyone

I hope that you had a blessed Easter Sunday yesterday.
We had a really lovely day, filled with family, love and lots of Easter blessings.

I made some goodie bags and gifts for Easter for my family and used lots of BoBunny goodness.


We had come home from being away for 2 days and so I really only had very limited time yesterday morning to put these goodie bags and gifts together.  So I can honestly tell you that these took about an hour to put together.

For the goodie bags I used some Juliet party bags and then stamped on the bags.
The butterflies were also stamped and fussy cut.


The chocolate bars were wrapped in BoBunny decoupage paper, with some ribbon and a stamped Happy Easter label.


These were gladly and warmly received, so I was pleased with that.

Yesterday morning the kids and us also painted some boiled eggs, in the Easter spirit, and so thought I would share these with you too! ;-)


We really did have a lot of fun making these up.

Thanks so much for stopping by my blog today!
I hope you have a fabulous Monday!
Denise x


Sunday 27 March 2016

Bring on the Happy Card - FabScraps Teens Collection

Hello Everyone

I had to make a Birthday card for a friend of mine's boyfriend and so I used the Teens Collection from FabScraps, which was perfect for a masculine card.


Here's a closer look.


This stamped sentiment is a Penny Black stamp from a Birthday set I bought and is really one of the best purchases that I have ever made.  I use these stamps every other day.

Here's how I made this card.

Supplies List:
Patterned Paper: FabScraps #Teens C80 006 Togethering, FabScraps #Teens C80 007 Staycation, FabScraps #Teens C80 008 Hash Tag,
Journal Pack: FabScraps #Teens MC80 001A
Chipboard Remainder: Rectangle approx. 14cm x 6cm
Cardstock: White and black
Greeting Stamps – Bring on the Happy – Penny Black
Pigment Ink – Black
Die-cuts: stars and chevrons
White Gel Pen & Black koki pen
Washi Tape: Blue
Liquid Pearls: Chocolate
Black embossing powder

Instructions:
  1. Cut a piece of white cardstock, 15cm x 30,5 cm and fold in half.
  2. Cut a 13,5cm x 19,5 cm piece from the brick side of the Staycation patterned paper.
  3. Cut an 8cm x 18cm piece from the green side of the Togethering patterned paper.
  4. Stick the brick patterned paper piece onto the front of the card and outline the paper with a black koki pen.
  5. Stick the green patterned paper rectangle onto the brick paper, 2cm from the left edge of the brick paper. Outline this green piece with a black koki pen.
  6. Heat emboss the chipboard rectangle with the black embossing powder.
  7. Stick this down into the centre of the green patterned paper.
  8. Die-cut some stars from the stripey side of the Hash Tag patterned paper and some chevrons from the black cardstock.
  9. Use the star die-cut element from the Journal pack and outline this with a black koki pen.
  10. Stamp the sentiment onto the centre of this star die-cut element.
  11. Use double sided tape to stick down this star element in the centre of the embossed chipboard rectangle.
  12. Add the stars and chevrons and adhere to the card, as per the photo. Outline with a white gel pen.


Thanks so much for stopping by today!
I hope you have a blessed Easter Sunday and are spending it with family and friends.

Denise x

Thursday 24 March 2016

Sizzix Easter Egg Hunt

Hello Lovely People

Wouldn't you want to win some yummy Sizzix goodies??
Join the Easter Egg Hunt and you could very well win some! ;-)

http://goo.gl/ECycvM

The lucky winner will take home a Big Shot Express machine, cute chicks, floral wreath set and the Oliva die from Chapter 1!

Don't delay, hop over today! ;-)

xx

Wednesday 23 March 2016

Decoupage Mini Album - Berry71Bleu March Challenge

Hello Everyone

I am up on the Berry71Bleu blog at the moment, with a decoupaged mini album.
This is for the March Mood Board, which is really so gorgeous! ;-)
It is also doubling up as a birthday gift for my sister, as it is her special day is next week.


The colouring from the mood board, was my biggest inspiration, along with the gorgeous flowers.

So here is the cover.


I used the gorgeous new, decoupage paper from BoBunny from the Soiree collection with copious amounts of heavy gel medium and some gesso, paint and inks.

The cover elements are also from the beautiful Soiree Collection.

Here's a look at the back cover too.


If you want to the see the inside pages, then you please need to pop over here to the Berry71Bleu blog! ;-)

I love how this album turned out and I hope that my sister will love it too!

I hope you have a super evening!
Denise x


Tuesday 22 March 2016

Bring on the Happy Card - FabScraps Kaleidoscope Collection/ Sizzix Bigz Die - Circles

Hello Everyone

I hope your Tuesday has been good!
Since yesterday was a Public Holiday here, it sure feels like a Monday today! LOL

I have a card to share today, using the colourful and kinda retro collection from FabScraps, Kaleidoscope.


I also used the  

Sizzix Bigz Die - Circles, which were perfect for this Design! ;-)


I then also embossed these circles, with a Sizzix embossing folder, which gave them raised dots.

I heat embossed the butterflies and added my stamped sentiment.


Here are the instructions, if you would like to know how to make it! ;-)

Supplies List:
Card Kit: Kaleidescope MC83 001A
Chipboard: FabScraps KaleidoScope Die-Cut Chipboard Shape Butterflies DC83 013
Cardstock: Purple and Fuschia
Greeting Stamps – Bring on the Happy – Penny Black
Pigment Ink – Black
Die-cuts: Sizzix Bigz Circles
Embossing Folder: Sizzix Dots
White embossing powder
White acrylic paint

  1. Cut a piece of purple cardstock, 15cm x 30,5 cm and fold in half.
  2. Cut down a piece of circle patterned paper from the card kit to fit the cardstock. Approx. 14cmx14,5cm
  3. Cut some circles from the purple and fuschia cardstock and then emboss these with the Sizzix embossing folder.
  4. Cut some of the circles down to fit within the circle patterns on the patterned paper, as per the photo.  Stick these down onto the card.
  5. Raise the 2 whole circles with double sided tape and adhere to the card.
  6. Add highlights to these circle edges with white acrylic paint, as well as all the edges of the card and patterned paper.
  7. Stamp the sentiment with black pigment ink, as per the photo.
  8. Heat emboss the chipboard butterflies with white embossing powder.
  9. Adhere these, with double sided tape, as per the photo.

Thanks so much for stopping by!
I hope you have a super evening!
Denise x

Sunday 20 March 2016

Art Journal Page - FabScraps Vintage Elegance

Hello Everyone

I hope that you are having a super weekend! ;-)

Today I am sharing an art journal page that I created, using the FabScraps Vintage Elegance Collection,  This collection is really fabulous! ;-)

So here's the result.


The sentiment of this page is "A life without dreams would be just a life".

I fussy cut all the flower and leafy elements.


I used some clear crackle medium for the first time ever.  It was really fabulous to use.
Of course, I added some watercolours, some stamping and some outlining of the stencilled areas.
I really did have some good, messy fun! ;-)

I would love to create some pages more often, but time just does not allow.

Thanks so much for stopping by!
I hope you are having a super and restful Sunday!
Denise x

Saturday 19 March 2016

Published Work - Scrap Affairs and Cardmaking & Papercraft Magazines

Hello Everyone

The new issue of the Scrap Affairs Magazine came out last month and I had some BoBunny Cards published in the magazine.  

It always a delight to see one's work published.


Then I also bought a copy of the Cardmaking & Papercraft magazine in November and it had some wonderful BoBunny Isabella papers and a stamp inside.
I made a card from these goodies and it was published in a January edition, in a letter to the editor.


I am so honoured and blessed! Thanks so much to both magazines! ;-)

Anyways, hope you have a super Saturday!
Denise x

Thursday 17 March 2016

Happy Day Tag - FabScraps Vintage Elegance

Hello Everyone

I have a FabScraps project to share with you today, using their absolutely gorgeous and beautiful Vintage Elegance Collection.  It really is gorgeous.

I created a mixed, media tag.


Here's a close-up.


I have a little tutorial for this tag too.
So if you want the details...here they are! ;-)

Supplies List:
Patterned Paper: FabScraps Vintage Elegance Enchantment C84 002, FabScraps Vintage Elegance Gentleness C84 006
Cardstock: 2 shades of green and brown
Kraft corrugated board
Blooms: 4 small white spring blossoms
Die-Cuts: Various Leaf die-cuts
Liquid Pearls: White
Jumbo Java Pigment Ink

Gathered Twigs Distress Ink Paint and white acrylic paint
Sentiment stamp
White Gel Pen
Stripey Lace

     Instructions:
  1. Cut a piece of green cardstock 13,5cm x 19cm and distress the edges.
  2. Cut a piece of brown cardstock 12,5cm x 18cm and distress the edges.
  3. Cut a piece of patterned paper (Stripey side of Enchantment) 11,5cm x 17cm and distress the edges.
  4. Paste the patterned paper onto the brown cardstock. Now paste the brown cardstock onto the green cardstock.
  5. Tear 2 pieces of Kraft corrugated board, as per the photo and stick them down on the left hand side and right hand side of the tag.
  6. Use a paintbrush to firstly add the Gathered Twigs distress paint over the edges of the various layers and over the corrugated board raised edges.  Once this is dry, add some white acrylic paint over the same areas, to add some highlights.
  7. Cut various leaves from the various leaf die-cuts and various greens and Gentleness patterned paper (green side).  Add highlights with a white gel pen.
  8. Fussy cut some of the flowers from the Gentleness patterned paper and edge with some brown pigment ink.
  9. Stamp the “Happy Day” sentiment in the top right hand corner with brown pigment ink.
  10. Ink the edges of the spring blossoms with some brown pigment ink.
  11. Layer up and then stick down the fussy cut blooms, the leaves and the spring blossoms, as per the photo.
  12. Add some white liquid pearl dots and highlights on the fussy cut flowers.
  13. Cut a 9cm piece of stripey lace and fold over and adhere to the top left back of your tag.

Thanks so much for stopping by today!
I hope you have an awesome day!
Denise x


Wednesday 16 March 2016

Easter Egg Hunt with Sizzix

Hello Everyone

How about winning some yummy Sizzix goodies???


Take part in their exciting Easter egg hunt! They have hidden 5 eggs (like the eggs above) on their website for you to find. Find all of them and enter the pages you found them on along with your email address for a chance to WIN over £200 worth of prizes!

Now that's worth hopping over for! ;-)


Thanks for stopping by!
Denise x


Play - BoBunny Toy Box Collection

Hello Everyone

I have a mixed media layout up on the BoBunny blog! ;-)

I used some of the fabulous new Toy Box decoupage paper and this gorgeous new collection.

Here's a little sneak peak.


I would really appreciate it, if you popped along and had a look.

Thanks so much for stopping by!
I really do appreciate your comments and love! ;-)

Have a super day!
Denise x

Tuesday 15 March 2016

Sizzix Easter Makes

Hello Everyone

With Easter coming up, are you making some Easter goodies?

Why not pop over to the Sizzix blog and see their cute and gorgeous inspiration! ;-)


Hop on over and check it out! ;-)

Have a super day!
Denise x

A Day of Fun - Scrap Africa Mood Board no.71

Hello Everyone

I hope that you had a super Monday yesterday and that the start of the week has been good.

We have a new mood board challenge up at Scrap Africa.
It's a fun, fresh and vibrant board.


I went with a boy page, which is perfect for this colouring.


I used bits and pieces from all sorts of collections and really did dive into my stash.  It was good to use from THE stash! ;-)

I was so pleased to also be able to use a fabulous die-cut that I got from Sizzix.
It really is gorgeous and I had so much fun using it.

Sizzix Thinlits Die - Bright Bubbles

Here are some close-ups of the page and also the fun die-cut.


This photo was taken of Joe on a visit, 2 years ago, to the Bunny Park.
It really was a fun and lovely day out and Joe was in his element, to be out and about.

So maybe play along with the mood board? Maybe also pop along and see the gorgeous work from the Design Team?

You have until 31 March.

There is also R300 FabScraps surprise parcel up for grabs.


Thanks for stopping by!
Have a super duper day!
Denise x


Monday 14 March 2016

Serviette Holders

Hello Everyone


I don't know where the time goes. The days just seem to zoom by! ;-)
I hope you had a lovely weekend and also found some time to scrap.

Today I am sharing some serviette holders that I made from a paper towel inner.
I cut it up into equal pieces then covered it with some pretty BoBunny patterned papers and then added some die-cut leaves and fussy cut flowers.

Here is the result below.


I used the Secret Garden Collection, with is so beautiful and fresh.

It was also the perfect colouring for my purple serviette's! LOL

So what did you create or work on this past weekend?

Wishing you a super Monday!

Denise

Wednesday 9 March 2016

Farewell Card - Graphic 45

Hello Everyone

I hope that you have had a good Wednesday! ;-)

Johannesburg has been grey and cloudy today, with lots and lots of rain! It is so very needed and so very welcome! ;-)

I was asked to make a farewell card for someone that is leaving our workplace.
So I dove into some of my Graphic 45 goodies and created this card! ;-)


I have been wanting to use this quote and beautiful dolled up lady, for a while now! ;-)

Here's some close-up of the clusters and my homemade flowers.


Well I hope the lady liked it and wish her well in her new job! ;-)

Thanks so much for stopping by!
I hope you have a super evening!
Denise x

Tuesday 8 March 2016

Friendship Card - Sizzix

Hello Everyone

I have a friendship card to share with you today, using some yummy Sizzix goodies! ;-)


For the background I used the 

Sizzix Textured Impressions Embossing Folder - Woodgrain #3

Sizzix Textured Impressions Embossing Folder - Woodgrain #3
I inked some brown pigment ink onto the embossing folder before I embossed the paper and the background was the result.  I love how it turned out! ;-)

I then also used the

Sizzix Framelits Die Set 4PK - Ovals, Scallop

Sizzix Framelits Die Set 4PK - Ovals, Scallop

as part of my design too.

I also handmade the flowers by cutting lots of die-cut flowers and then layering them up, inserting some stamens and gluing it all together.

Here's another view.


I love how this little card turned out and I am always keen to have a variety of cards on hand.

Sizzix is also encouraging everyone to share your makes and takes on their blog! ;-)
Pop over here for the details! ;-) They would really love to see what you create!


Thanks so much for stopping by my blog today!
I hope you have an awesome evening!
Denise x

Monday 7 March 2016

Graphic 45 Design Team Audition 2016

Hello Everyone

I am so excited with this post! This is the first time that I am ever applying for the Graphic 45 Design Team.  It's really thrilling for me! ;-)

I am going to showcase 3 projects and a tutorial.

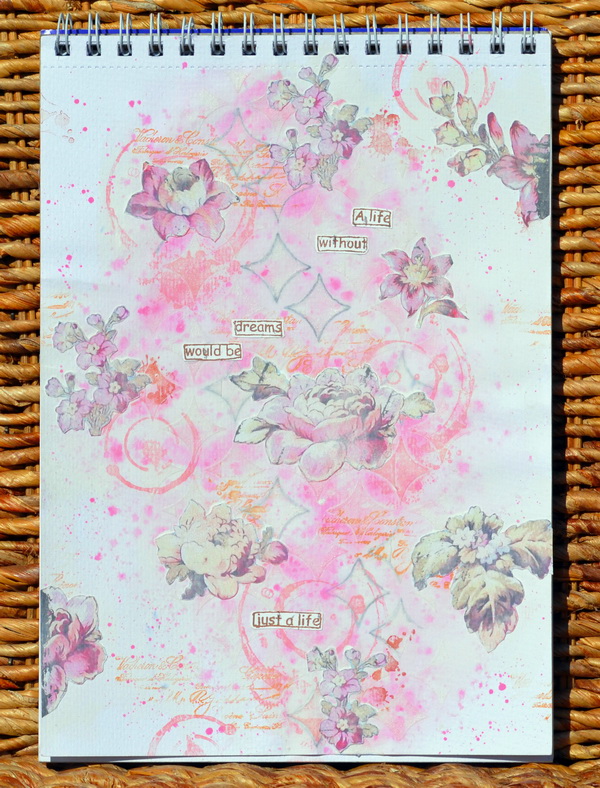
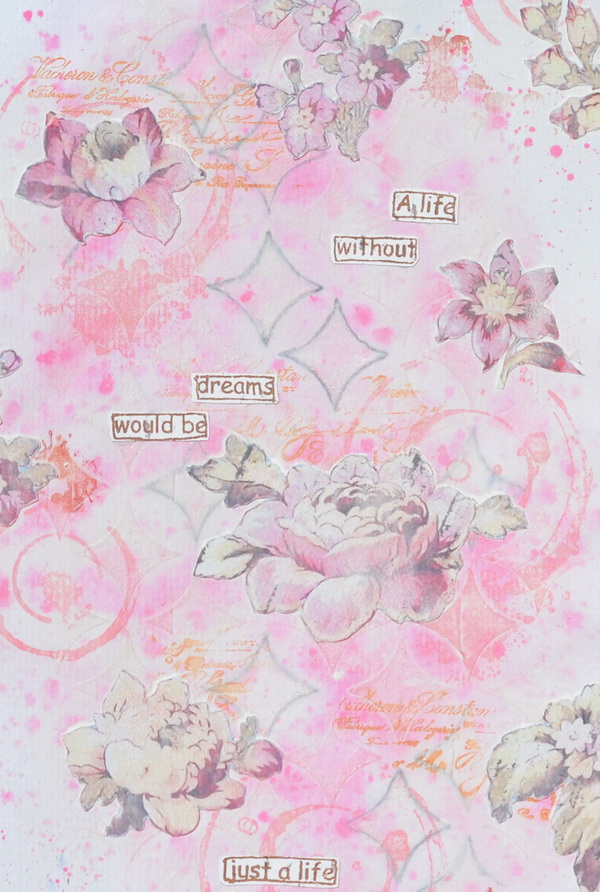
Firstly I have a journal page, which I created not too long ago, using the Times Nouveau Collection from Graphic 45.


I am a HUGE mixed media fan and so many of my projects include this.
The sentiment is also one of my favourites! ;-)

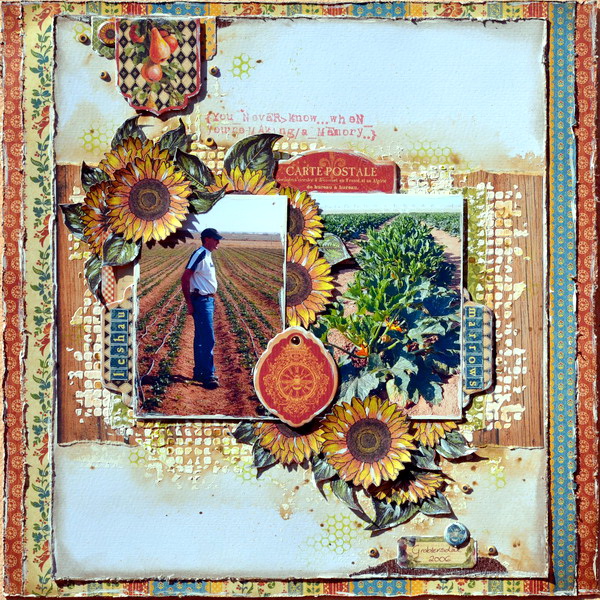
Secondly, here is a layout that I created for one of the Scrap Africa challenges!


I still absolutely adore this collection, it is really one of my favourites! ;-)

My last project, is an off the page project, which was actually a gift for my Mother, for last years Mother's Day.  It was a really special project for me.


This tutorial for this post is also the tutorial for the above project.

Tutorial - Altered Book Canvas

Supplies Used:
Canvas Board – Pro-Art – Size can vary and is dependant on the size of your book.
1 x Old Book
Moment in Time Papers by Graphic 45
Cardstock – 2 shades of green
Chipboard Leaves – Celebr8
Scarab Beetle & Circles Chipboard – UmWow Studio
Wood Textured stamp – BoBunny
Resin Heart - Prima
Purple Flowers – Petaloo
1 x Distress Paint – Gathered Twigs – Tim Holtz
1 x Water Spritz Bottle
Acrylic Gesso
Paintbrush
Distress Inks –Walnut Stain
VersaMagic Chalk Ink– Jumbo Java
2 x Leaf Die Cuts
Acrylic Paint – White and Greens
Sticker Title – Mother
White Craft Glue
1x sheet A4 paper

Instructions:

1. We start with the old book that we are going to recycle.  Find, approximately, the middle of the book and then really bend the book open, so that there is a good crease in the seam of the book.


2. Take a good amount of white craft glue and cover both the front and back cover with glue and stick the open book down, onto the middle of the canvas.  Place a heavy object over the book, so that the covers can dry flat onto the canvas. Allow this to dry.
3. Tear the A4 paper in half.  Put the 2 ends together and glue them but do not fold.  Now place this about 2 to 3 pages down, from the centre of the book, with the rounded end towards the seam of the book.  This allows for the book pages above it to stand up slightly.  Glue this piece in place, as well as the book pages, to keep them puffed up. See photo below.


4. For extra support, glue some of the pages near the book covers down, as well.
Take a paint brush and now gesso the canvas, along with the book, covering the ends of the pages, so that they stay down mostly and the middle of the book.  Leave some of the writing visible, as this adds to the feel of the project.  The gesso acts like a glue and seals everything down.  Make sure that you especially cover the areas in and around the book covers.  If there is too much colour on the original book covers, then make sure that you whiten out the colouring with the gesso. Allow this to dry. See photo below.


5. Once the gesso is completely dry, take some Gathered Twigs Paint and mix in a fair amount of water. Mix 1 part paint to 10 parts water, approximately.  Now cover your entire canvas, book edges and book centre with this paint/water mix.  Leave some of the writing visible on the page.
If you find your mix is to dark, use a paper towel to wipe some of the paint off or spritz some water on to lighten in.  You don’t want an even colouring, as you are creating an “aged” feel, so some parts must be lighter and some parts darker. Allow this to dry.
See photo below.


6. Make sure to also colour your resin piece (in this case I used a heart) with this mixture.
Now add some stamping with the wood grain/textured stamp, all around the book, on the canvas, using Walnut Stain Distress Ink. At the same time, use the Jumbo Java pigment ink to colour the edges of the canvas and also the edges of the book pages. Allow this to dry.
See photo below.


7. So now one can start adding some papers and embelishments. I firstly cut out and stuck down the patterned papers from Graphic 45 – Moments in Time.  You can use any pretty patterned papers. Turn their edges up to give them an “aged” feel.  Don’t cover the entire book, as it is nice to see some of the printed writing too. Remember to ink all the paper edges with Walnut Stain Distress ink or the Jumbo Java pigment ink.
8. I cut up the Celebr8 leaf chipboard pieces, into smaller bits, so as to trail all the pieces down, from the right hand page, over the centre of the book and then down to the left page. I stuck these down with glue and then coloured them with different shades of acrylic green paint and then highlighted them with white acrylic paint. I then added the Petaloo flowers down this cascading chipboard leaves. Glue these down with glue.
9. Die-cut some leafy bits with the leaf die-cuts from the green cardstock.  Use these are fillers between the chipboard pieces and blooms.  Allow the glue to dry.
10. Lightly add some gesso over your flowers and leaves, with a paintbrush to add highlights.
Stick down your resin pieces and your other little chipboard fillers.  They can be coloured with paints or pigment inks.
11. Lastly add a title for your project.  In this case I used the sticker “Mother” but can be substituted with any title or theme. The final result are the photo's below.


Here's another look at the completed project.


 I really do love Graphic 45 goodies and I would really love to be a part of their team! ;-)
So please hold thumbs for me and let's see what happens! ;-)

Thanks so much for stopping by my blog today!
Have a super Monday!
Denise x